Adding Foscam camera
From eedomus - Documentation
The screenshot may depend on your Foscam hardware and software version.
Create a camera module in eedomus
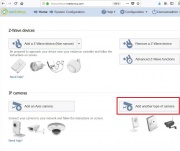
Go through: Configuration -> Add a device -> Add IP Camera -> Other
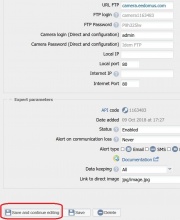
When you have the page below (with all the parameters, click on "Save and continue editing", so the FTp account is created while you configure the camera.
Configure your foscam with the FTP parameters
Add the FTP server of Focam
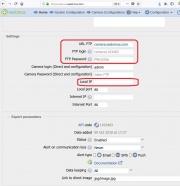
You should report the "camera*.eedomus.com", "camera*****" and "ftp password" on the Foscam camera page.
You have to connect first to the Foscam web server. To do so, you have to find the IP address, such as : http://192.168.1.103 as the exemple below, and add the port number which is 88 by default.
By the way, add this IP in eedomus, it will be used in the live view section.
In the exemple below, the address is http://192.168.1.103:88 (the bold numbers should be different on your network).
Check the FTP configuration with the "Test" button.
Then add a regular snapshot and/or snapshot on detection.
Check that you can see image in the eedomus widget camera.
The "IP Internet" should be filled automatically by eedomus.
Configure the live view
You have to configure the direct link : "URL". The URL is ... snapPicture2 on our model. Notice you have to pass the admin/password in the URL.
You have to configure your camera with the user "admin/P9h325lw" in our example.
The live view should be available on your local network.
To make the live view available outside your home, you have to add a inbound port on your internet router.


