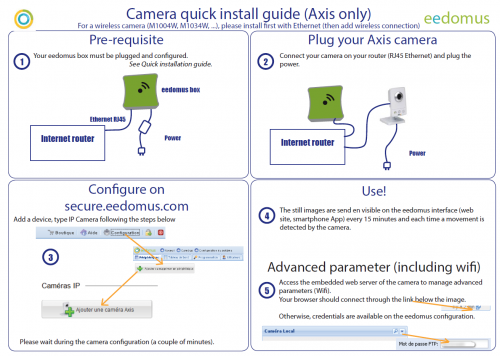
Add an IP camera
From eedomus - Documentation
Contents |
Principles
Cameras have to be manually configured. The installation has to be processed in in two steps:
- - The creation of a camera device on the website eedomus.com
- - The configuration of the camera through its own website
Recent Axis cameras are not configured automatically anymore, after a change in Axis software.
This results in the camera sending images to the eedomus ftp platform.
Then, you can configure de Live view. In the Live view, the images do not go through the eedomus box (too much load), they are called directly by your interface. Thus, you have to configure an inbound port on your internet routeur (unless you use an Axis camera that do the task directly).
Proceedings of the automatic configuration (not working anymore at this time)
So that the camera is recognized, it must not have been configured (factory password).
Connect the camera to the same router as the ADSL box eedomus (you can then move it).
Click "add a camera" in the website interface.
You can print the Quick Setup Guide enclosed.
Manual configuration
Create the device
Go to Settings => Peripherals => Add a device (manual) => Add a camera (manual)
You may choose a brand.
This page gives a 'ftp' account that will allow the camera to download its images on the eedomus cloud service.
Configure the camera itself
The IP camera setup should be done with the manual of the camera itself. We cannot offer support on the configuration of all brands.
The principles of the configuration are as follows ( for details on Axis camera, see: Camera Manual Setup):
- Connect the camera to your network (with an ethernet cable)
- On your PC, identify the camera in the UPnP devices on your PC, and click to go to the website of the camera
- On the website of the camera (see below for security passwords to access)
- Configure the ftp server with the parameters of the above chapter
- Activate the motion detection (for sending images on the server)
- After testing the operation with a wired network (images date back well on the website eedomus), configure the wifi if necessary
To access the Live (it's a bit technical):
- Change the master password the same password as the ftp account (login is admin, to check on the camera)
- For local access (this will allow you to access images from home)
- Configure the local IP address of the camera (and port if it is not 80)
- If the camera is not in the list of brands offered, choose Other, and add the link to the JPG image (which will come after http://my_ip_adress/ )
- For access from Internet (outside of your local network that the camera is installed)
- Add an incoming port on your router (unless your camera in the open UPnP NAT)
- Configure the remote port
The Direct will not work directly on Internet Explorer which removed some features in recent versions. The password must be re-entered. The Direct operates from the moment the first images have been uploaded to the ftp account'
We recommend you enable UPnP to more easily find your camera on the LAN: - Activation at the router (often enabled by default) - Activation of the camera (this is often enabled by default) - Activation on your personal computer (click on the Network folder on Windows)
Connection
The options
Camera requires a power supply, and a connection to your LAN.
There are several ways to connect your camera to your local network. The easiest way is not necessary the best long-term. These opportunities include:
- Wifi, this is the simplest
- Passing by CPL boxes, quite convenient, avoids the "waves" wifi
- Wired, if you have the opportunity to take an Ethernet cable, it's best
For the camera, the CPL does not require any special configuration. This is identical to the direct Ethernet cable.
Note that the high-end cameras are sometimes fed by a single Ethernet cable to simplify installation (this is called Power Over Ethernet, PoE, PoE and requires a box).
Connection through PLC
There are multiple suppliers PLC. We advise that leave taken appear a connection (not to block a decision), and displayed on an LCD mini plugs close at PLC with the quality level (this greatly facilitates the diagnosis). We have taken positive feedback from Devolo, but there are many suppliers and materials that have been changing very quickly.
Connecting to your wireless network
To set up a camera on your wireless network, you must first configure it wired and keeping it running.
You must log on the Web server of your camera from a web browser.
You have two ways to "find" the IP address of your camera: - Or use the site http://secure.eedomus.com (the last known address of the camera is entered in the configuration) - Or use the UPnP broadcast of the camera (Windows XP and Seven, the next click on "Network"), one click will open the browser.
The address of the camera is certainly the type: http://192.168.xxx.yyy
The web server of the camera will prompt for a password. Axis cameras: the id is "root" and password ristration is identical to the ftp which is located in the space configuration of the camera on secure.eedomus.com. See How to access the password of the camera?
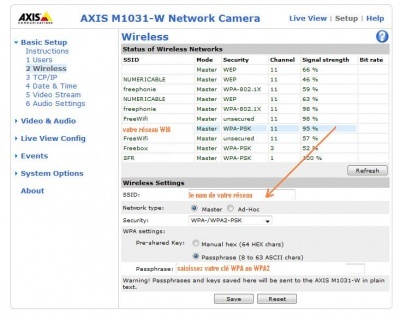
Once on the internal website to the camera, you must go to "Wireless", see image below.
Click on your network in the list of networks. The name of your network information below in the SSID field. Then enter your wireless key without typing error (and type: WEP, WPA, ....). Remember to "save". Disconnect the Ethernet cable and make a test to see if the web server is accessible from the camera.
Reliability
The connection "Wired" is preferable to the connection "wifi". In particular, on some wireless networks, the camera may lose its connection when the router is restarted. In this case, reconnect the camera (or install an outlet controlled).
Safety
During automatic configuration, the password of the camera is changed by a complex password. You will find in the camera setup (this is the password ftp, login for Axis cameras is "root"). See How to access the password of the camera?
During automatic configuration, the camera attempts to communicate with the ADSL router to have it open an incoming port (UPnP NAT). This allows you to view the video out of your home (and with a complex password that protects you). You can disable this feature on your router or reconfiguring the camera.
If you use manual configuration, please note your passwords. The default passwords for cameras are (Allnet : admin/admin, Axis : root/pass, Samsung : admin/11111111, D-link : admin/"vide", Edimax : admin/1234) that we recommend you to change by the password ftp(especially if you open an incoming port on your router to access live camera away from home). This password will facilitate access to live pictures via the portal.


