Camera Manual Setup
From eedomus - Documentation
You will find below the main operations during automatic installation. You may use this information to modify camera settings, or to understand for a different kind of camera.
Configuration may vary depending on the camera models and versions slightly.
Contents |
The two main events
Configure ftp server on the camera
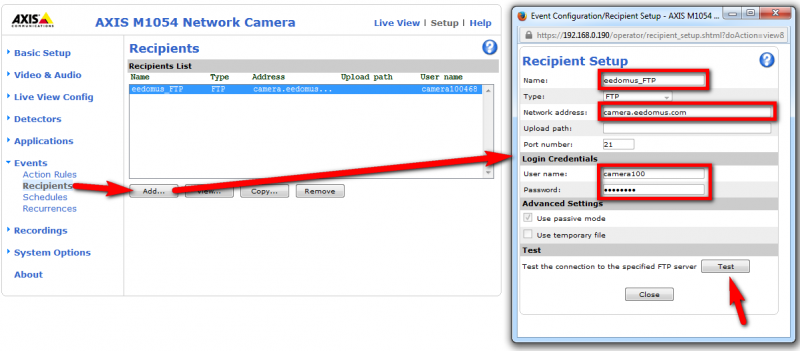
Prior to the event, you must configure the ftp server eedomus on camera
- Menu Events => Recipients => Add
- on old version, you may have the menu Menu Events => Event server => Add FTP
The parameters to enter are visible on eedomus (in the configuration of the camera, it must have previously created).
- FTP Server: camera.eedomus.com
- User name (ftp username) camera99999999 (with the number of your camera visible on eedomus)
- Password (FTP Password) xyxyxyxxy (with password ftp password, which also serves as the FTP login and the login on the camera, offered by the site eedomus)
Proceed as shown:
Sending regular picture
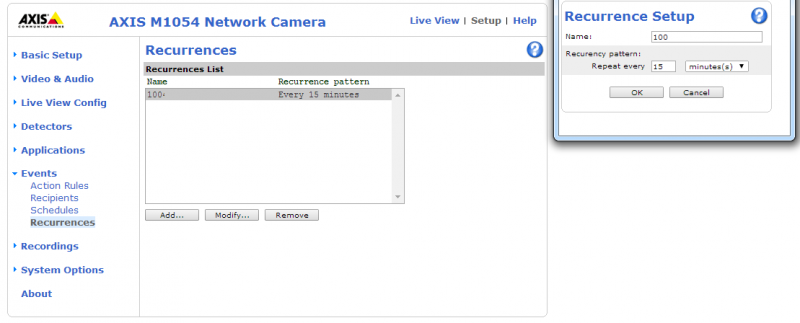
In recent version, you have ot create first a reccurence :
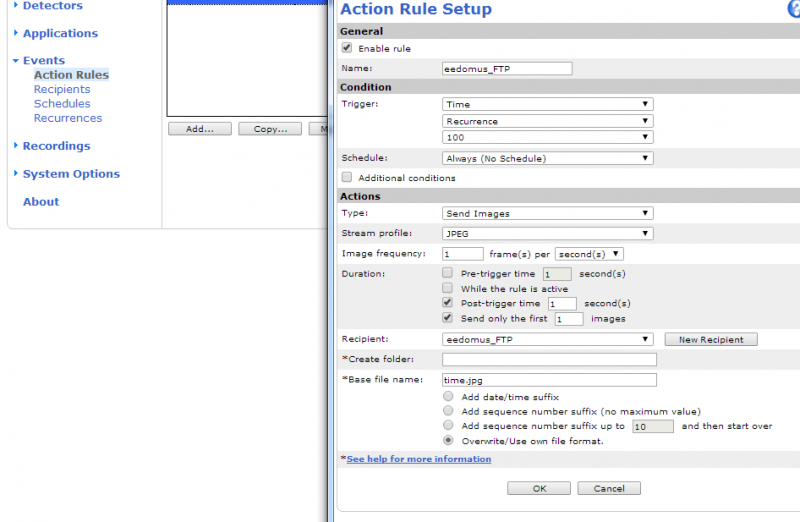
Then create an Action Rules (Event) on this Recurrence (the old way was to add a Event : Schedule Type).
The setting below is sending an image four times per hour (ie every 15 minutes).
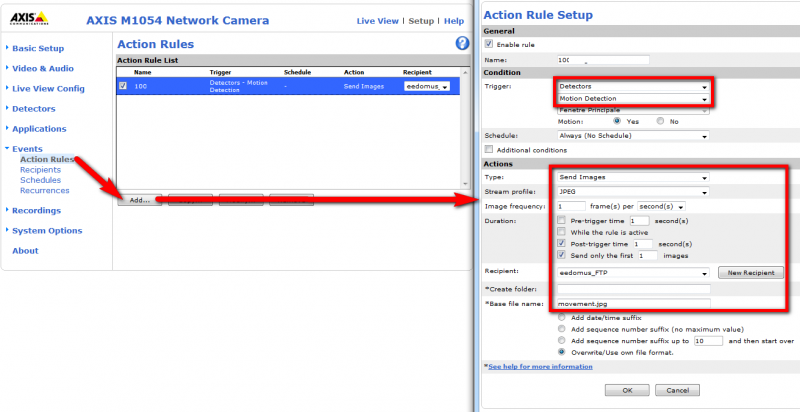
Sending image motion
The movement may be one of the image or a PIR (for cameras that has Axis M1034W, M1054).
- Check that the motion detection (picture) is activated
- You activate the motion detection
- Enhance sensitivity (at least 95% threshold)
The configuration is done with the following parameters:
Other parameters
Time
For your camera is on time (this is not strictly necessary but preferred), add an NTP server, eg fr.pool.ntp.org (depending on your time zone)
Network Configuration
These parameters are normally provided by DHCP, but if necessary, it must exist on the camera:
- The IP address of the gateway (gateway)
- The IP address of a DNS server (which may be the gateway, or the public Google DNS: 8.8.8.8)
If the configuration is manual, we recommend that you use a static IP address of the camera (to be set by DHCP from the router the MAC address of the camera, for example), or fixed directly onto the camera. And see the IP address on the site eedomus. We also recommend that you configure the port manually entering.
If you are using automatic configuration, you can safely remain as default variable IP address via DHCP and the incoming port is configured automatically (if the router supports it, which is the case for the majority of operators adsl box) .
Password
The password for the "root" account should be changed to the password provided by eedomus.
- This has an advantage in terms of safety (do not leave the password by default).
- This allows interactions between eedomus and camera (including direct access).
Wifi
Wired made a test before moving the camera WiFi: Check the images on your back well interface eedomus.com
The procedure to change the wifi compatible cameras is described at the bottom of the page Add an IP camera.


