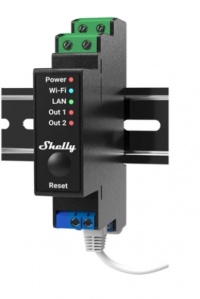
Shelly Double Relay DIN
From eedomus - Documentation
This page describes the connection of a Shelly Pro 2PM module to eedomus. Shelly is a brand of the Bulgarian company Allterco.
This module comes in DIN format (1U) and controls 2 relays, with consumption measurement. It communicates via LAN and Wifi (we only use LAN here).
This page describes all the steps to control the relays with eedomus, without installing any smartphone application and without using any third-party cloud.
There is also an "Shelly" module on the eedomus store (thanks KikiFUNstyle) which generates step 2 for all types of Shelly.
This page describes a completely manual configuration, without using this eedomus store module.
First step - Connecting the Shelly to the LAN
Power the Shelly with 220 Volt (phase and neutral at the bottom of the relay), with an Ethernet port previously connected. Be careful, handling 220 Volt requires some experience. For devices with direct connection to 220V, it is preferable to carry out the configuration in the workshop, BEFORE placing the device in its final location.
The module connects to the local network, using DHCP.
You then need to find your IP address. You can find its address on your internet router, or with the eedomus Scanner function, or the Wifi access point below. You connect via HTTP (not HTTPS) to the IP address.
We recommend switching the module with a fixed IP address outside the DHCP range. For example: http://192.168.0.200 (if your network is 192.168.0.xx).
The module is also a Wifi access point, with a Wifi name that starts with Shelly*****. It is possible to connect to it with a laptop or a smartphone equipped with WiFi. Using a web browser, enter the address http://192.168.33.1/. This step is required only if you don't use the LAN connecion.
You can update the Shelly software directly via the interface for this module. It is recommended during the first setup.
Second step - Creation of an actuator to control 1 relay with eedomus
This involves creating an “HTTP actuator” module.
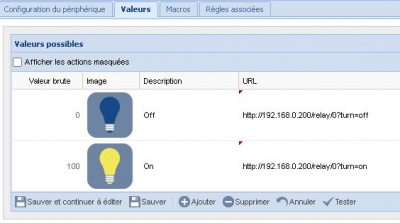
You create 2 values: ON and OFF (which is done automatically if the module is of the “lighting” type).
For the ON value: http://192.168.0.200/relay/0?turn=on (and for the OFF value: http://192.168.0.200/relay/0?turn=off). There are other syntaxes that also work for this URL.
Test the URL on a web browser before entering it into eedomus!
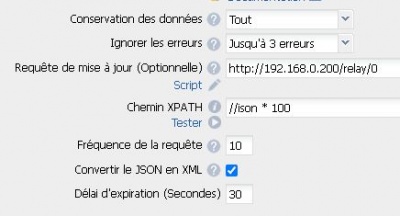
To update eedomus with the value of the module if you activate it outside eedomus: http://192.168.0.200/relay/0 by checking the parameter Convert JSON to XML and with the XPATH: //ison * 100 (for light whose raw values are 0 and 100). There is another way using Action-Webhook to update the status on eedomus.
There is nothing else to configure, unlike MQTT.
Third step - Additional settings
We recommend adding your WiFi network in addition to the LAN.
However, we recommend deactivating the Wifi access point (AP) which is active and open by default as well as Bluetooth if applicable.
This relay has the advantage of offering manual activations via a switch input (to be connected to a switch).
Note
With this configuration, the Shelly queries the time.google.com site (and that's all a priori, in addition to updates).
There are different URLs. You can verify that it works by calling: http://192.168.0.200/shelly
There is also http://192.168.0.200/rpc/Switch.GetStatus?id=0 which gives the power consumption of relay 1.
Actions work on this model to directly notify eedomus of a change of state. They can be configured by the interface, or by a command, of the following type for the local API http://192.168.0.200/rpc/Webhook.Create?cid=1&name="eedomus_ON"&enable=true&event="switch.on"&urls=["http://eedomus.local/api/set?api_user=** **%26api_secret=*%26action=periph.value%26periph_id=***%26value=100"]
You can also add password security if you fear an intrusion on your local network, and the command drives an opening. To control a lamp, we believe that the complexity disadvantages outweigh the security advantages (which only occur if the local network is corrupted) for an individual.
Other Shelly devices are listed here : Shelly devices
More information: Configuring a Shelly module with eedomus


